Leatherwork - Tools and Techniques
Dying Leather
Over time vegetable tanned leather develops a wonderful rich warm brown patina all on its own, an effect enhanced by exposure to the sun. All that is necessary is a clear finish such as the homemade dubbin described lower down on this page to condition and protect the leather.
Occasionally, however, a specific colour is required in which case it will be necessary to resort to dying the leather.
In industry, dozens of hides are dyed simultaneously in large wooden drums rotated by electric motor.
However, for the hobbyist or craftsman working with smaller quantities of leather hand-dying or dip-dying are the most practical alternatives.
I mostly hand-dye smaller items, only resorting to dip-dying for larger items such as belts. In both cases, I use Fiebings Pro dyes which are available in a wide range of colours and give excellent results.
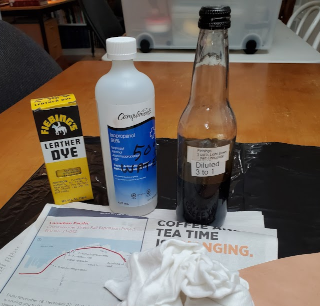
Whichever method one chooses, whenever working with dye it is important to protect work surfaces from splashes and spills which will otherwise leave a permanent stain. Black plastic garbage bags held down with masking tape and covered with newspapers provide excellent protection. And of course, don't forget to wear old clothes and disposable gloves to protect one's hands.
Prior to dying the leather, it can be deglazed by wiping, not soaking, the surface with a 50/50 mixture of water and 99% isopropyl alcohol. This helps to remove any grease and will open up the pores to better absorb the dye.
When dip-dying, a quantity of full-strength dye is poured into a suitable container. The leather is dragged slowly through the dye before being hung up to dry. Compared to hand-dying this has the advantage that the dye penetrates deeply into the leather and simultaneously colours the flesh side.
When hand-dying, although it is possible to use the dye full strength, I prefer to dilute it 3 to 1 or even 5 to 1 using 99% isopropyl alcohol.
The diluted dye makes it much easier to get an even streak-free finish. And, because it dries in minutes one can apply multiple coats in short succession to build up sufficient colour.
To dilute the dye I use cheap disposable measuring cups to transfer the appropriate quantities of dye and alcohol for the desired dilution ratio
into glass bottles with well-sealing screw caps.
Of course, one is not restricted to using only one colour of dye at a time,
two or more colours may be mixed together to create the desired shade, testing on scraps of leather until correct.
The diluted dye is applied to the surface of the leather using a dauber, a scrap of old t-shirt, or soft cotton painter's rags made from t-shirt material, using a rotary or side-to-side motion. Either way, using diluted dye ensures an even streak-free finish.
Once the dye has completely dried, buff the surface of the leather with a piece of clean white t-shirt material to remove any dye that has not been absorbed. This is especially important when using black dye which otherwise has a tendency to transfer to other materials or clothing.
After dying, the leather is often left stiff and dry. However, this is easily remediated by applying an oil or wax finish such as the dubbin described below.
Dubbin - An Excellent Leather Finish
A wide range of proprietary leather finishing products are to be found on the market, many of them quite excellent. But, for finishing vegetable-tanned leather my preference is a homemade dubbin (a contraction of dubbing wax), which is not only much cheaper than what is available commercially but also feeds and nourishes the leather and acts as a water repellant.
My first year out of high school was spent working in a tannery doing various odd jobs. One of my tasks was to make up large batches of dubbin which was rubbed deeply into tanned sides using a stout brush, buffed to a shine, and sold as "harness leather".
Unfortunately, I don't remember too many of the details as at the time my mind was more focused on girls, not leather. In retrospect, however, I wish that I had paid a little more attention to the job itself.
But from what I do remember, the dubbin was mixed up in a steel 44-gallon drum - equal parts by weight of two waxes were added to the drum, beeswax being the one, and either carnauba or paraffin wax the other, I don't recall which. This was followed by whale oil measured by the bucket. This of course took place in an era when we humans had a callous disregard for many of the natural resources which we now know are finite, and should be treated with respect.
A high-pressure steam wand was placed into the drum, the steam valve opened, and after a few minutes, the swirling action of the steam would melt the wax while thoroughly mixing the ingredients. Once cooled it had turned into a silky smooth paste-like wax which left one's hands even softer than the proverbial babies bum.
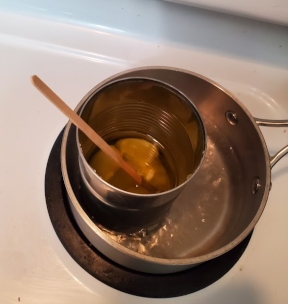
The tannery has long since gone, and, thankfully whale oil is now no longer obtainable. But, wanting to experiment with dubbin as a finish for my leatherwork, I came up with an alternative recipe that substitutes olive oil for the whale oil and which can easily be made on the kitchen stove in a double-boiler - a fancy term for a clean baked bean tin standing in a pot of boiling water.
Ingredients:
- 25 grams beeswax
- 25 grams paraffin wax
- 75ml extra virgin olive oil
- 5ml eucalyptus or tea tree oil to act as a fungicide
The quantities given above were chosen to about half fill a baked bean tin, which, in the interest of safety,
is about the maximum that one should boil at once.
However, if a larger double boiler is available then one can of course make up a larger batch while keeping the ratios the same.
Also, the exact quantities are not too critical, so there is no need to be absolutely precise when measuring out the ingredients.
Method:
- Obtain an empty baked bean tin, remove the label and wash the tin out well.
- Break the wax into small chunks and add to the tin.
- Add the olive oil along with the eucalyptus or tea tree oil.
- Place a small saucepan of water on the stove, stand the can containing the ingredients in the saucepan, and slowly bring it to a boil. The double-boiler provides a controlled heat that prevents the ingredients from overheating and possibly burning.
- As the ingredients melt use a wooden stick such as a coffee stirrer to carefully mix them together.
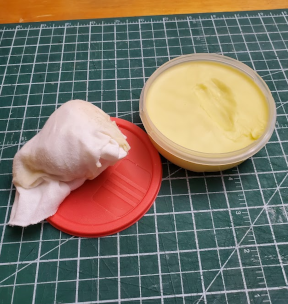
- Once completely melted, using oven gloves remove the tin from the boiling water and pour the contents of the tin into a container to set.
Once cooled, the dubbin is ready for use, I use old t-shirts or soft cotton painter's rags made from t-shirt material to apply the dubbin to the leather. Rub it in deeply and then buff it to a shine.
Burnishing
For a professional finishing touch to one's leatherwork, showing that a leather piece was made with care and attention to detail, nothing beats the smooth polished edges left by burnishing on vegetable-tanned leather.
After trying various methods with varying degrees of success I now mostly use clear
Seiwa Tokonole burnishing gum for this purpose.
If darker edges are desired, Tokonole is also available in black or brown or, alternatively, the edges can be dyed to suit prior to applying clear Tokonole.

Burnishing should be carried out after the final finish is applied to a piece. This seals the surface of the leather which will prevent any staining
from water or excess burnishing gum used during the edge burnishing process.
Burnishing steps:
- Bevel the edge using an edge beveler. I find that the beveler cuts better if the edge is first lightly dampened with water.
- Sand the edges using medium or medium-fine sandpaper. Wrapping the sandpaper around a rubber or wooden block helps to keep the paper square to the leather edge.
- Dampen the leather edge with water then burnish vigorously with a wooden burnishing tool also known as a slicker.
- Sand again to help get rid of any raised fibres.
- Dampen with water and burnish the edges once again with the wooden burnisher.
- If dark edges are required, now is the time to apply the dye to the edges using a dauber a q-tip or a disposable foam cleaning swab.
- Once the dye has thoroughly dried apply a thin coat of Tokonole using the tip of the finger.
- While the Tokonole is drying, burnish with a piece of canvas or other coarse cloth such as a scrap of denim from a pair of old jeans rubbed rapidly along the edge until the desired edge finish is achieved.


